What are these exercises?
These six simple exercises help keep your neck and shoulders moving and strengthen the muscles around them. Five are done sitting on a chair and one lying on your back. You do not need any equipment — just a firm chair with a good back support and a thin pillow.
Why they matter
In inflammatory arthritis, such as rheumatoid arthritis, the neck and shoulders often become stiff and painful. When something hurts, we naturally move it less — and moving less can make stiffness and weakness worse. Regular, gentle exercise helps to break that cycle.
Benefits
- Keep your neck and shoulders moving through their full, comfortable range.
- Strengthen the muscles that support your neck and shoulders.
- Can ease stiffness and make everyday tasks — such as looking over your shoulder or reaching up to a shelf — easier.
- Can be done at home, in a few minutes, without any equipment.
Risks and when to stop
Done slowly and gently, these exercises carry little risk. A few precautions still matter.
Before you start
- Talk to your doctor before starting any new exercise, and read all the instructions first.
- If you have had rheumatoid arthritis for many years, ask your rheumatologist before doing the neck exercises — especially tilting your head back and the neck resistance exercises. Long-standing rheumatoid arthritis can sometimes affect the joints at the very top of the spine.
- During a flare — when joints are hot, swollen and painful — ask your doctor which movements are safe for you.
Stop the exercise and contact your doctor if you have
- pain — not just a gentle stretching feeling
- dizziness or light-headedness
- numbness, tingling or weakness in your arms or hands
If pain continues after you stop, contact your doctor straight away.
Common questions
How many times should I repeat each exercise?
Your doctor or physiotherapist will tell you how many repetitions are right for you, and how often to do them. Start with a small number and build up slowly.
Is it normal to feel something while exercising?
A mild stretching feeling is normal. Pain is not. If an exercise hurts, stop it.
What do I need?
A firm chair with a good back support for the seated exercises, and a thin pillow for the chin tuck.
Practical tips: the six exercises
Breathe normally throughout. Move slowly and smoothly — never jerk or bounce.
1. Neck turns and bends
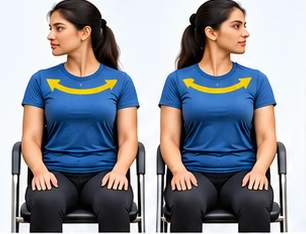
Turning your head
- Sit upright on the chair.
- Slowly turn your head to the right, as far as is comfortable.
- Slowly bring your head back to the middle, then turn it to the left.
- Relax. Repeat as advised.
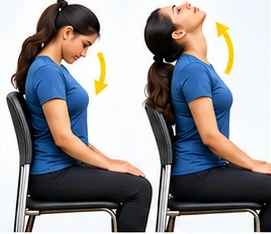
Bending and tilting your head
- Keeping your mouth closed, slowly lower your chin towards your chest.
- Bring your head back to the middle.
- Very slowly tilt your head back to look up at the ceiling — only as far as is comfortable.
- Bring your neck back to the middle and relax. Repeat as advised.
2. Chin tuck
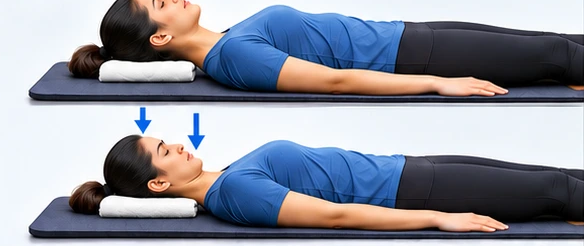
- Lie flat on your back with a thin pillow under your head.
- Tuck your chin in and gently press your head and neck back into the pillow.
- Hold for a few seconds, then relax.
- Repeat as advised.
3. Shoulder extension
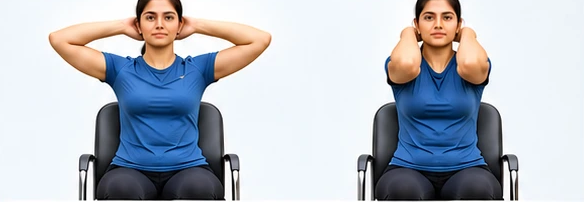
- Sit on the chair and rest both palms on the back of your head.
- Bring your elbows forward, towards each other.
- Then take them back out, in line with your shoulders.
- Relax. Repeat as advised.
4. Shoulder shrugs
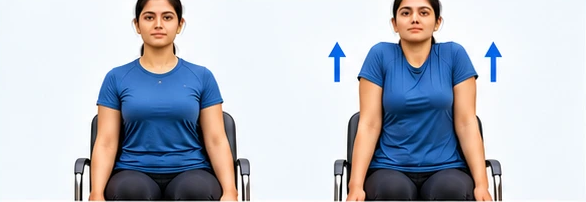
- Sit on the chair with your arms relaxed.
- Lift both shoulders up towards your ears.
- Hold for a few seconds, then let your shoulders drop and relax.
- Repeat as advised.
5. Shoulder circles
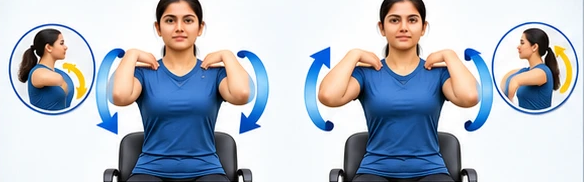
- Sit on the chair and rest your fingertips lightly on your shoulders.
- Move your elbows in circles in a forward direction. Relax.
- Now circle your elbows in a backward direction. Relax.
- Repeat as advised.
6. Neck resistance
Your head does not move in these exercises. The aim is to tighten your neck muscles without moving your head, so press gently.
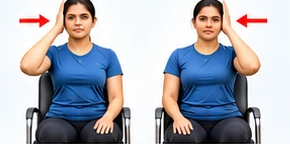
Sides of the head
- Sit on the chair. Place your right palm on the right side of your head.
- Press your head into your palm, using your palm to stop your head moving.
- Hold for a few seconds, then relax.
- Repeat with your left palm on the left side of your head.
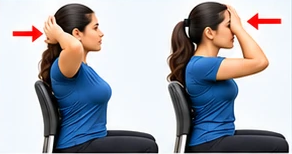
Front and back of the head
- Place both palms on the back of your head. Press your head back into your palms without letting it move. Hold for a few seconds.
- Place both palms on your forehead. Press your head forward into your palms without letting it move. Hold for a few seconds.
- Relax. Repeat as advised.
Do’s and don’ts
- Do: go only as far as is comfortable.
- Don’t: strain or force any movement.
- Don’t: over-exercise.
- Don’t: stay in one position for a long time.
Related conditions
Metabolic bone disease
Osteoporosis
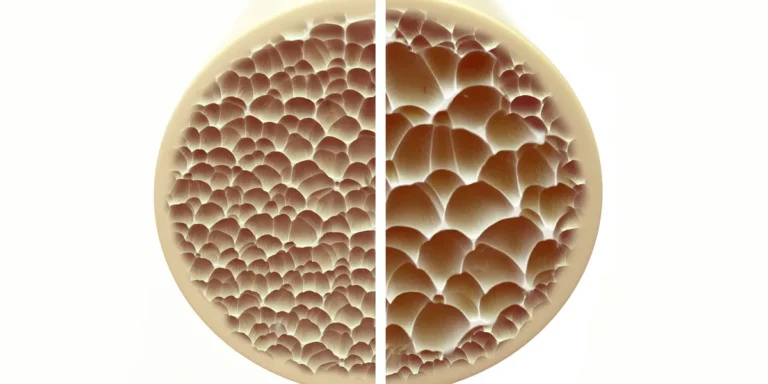
Osteoporosis is a condition in which bones become weaker and more likely to break, often without any warning until a fracture happens. It can be diagnosed with a simple scan and treated to reduce the risk of fractures.
References
- Exercises for mechanical neck disorders